XC WAAP Terraform/API の事前準備
※本資料の画面表示や名称は資料作成時点の画面表示を利用しております。アップデート等より表示が若干異なる場合がございます。
XC WAAP を操作するために必要な Terraform/API の事前準備
この章では、XC WAAP に関連するTerraform/APIの情報を紹介します
Terraform/API で利用する証明書の取得
Terraformを実行するホストでAPIに接続するための証明書が必要となります。証明書の作成方法を示します。 マニュアルは以下のページを参照してください。
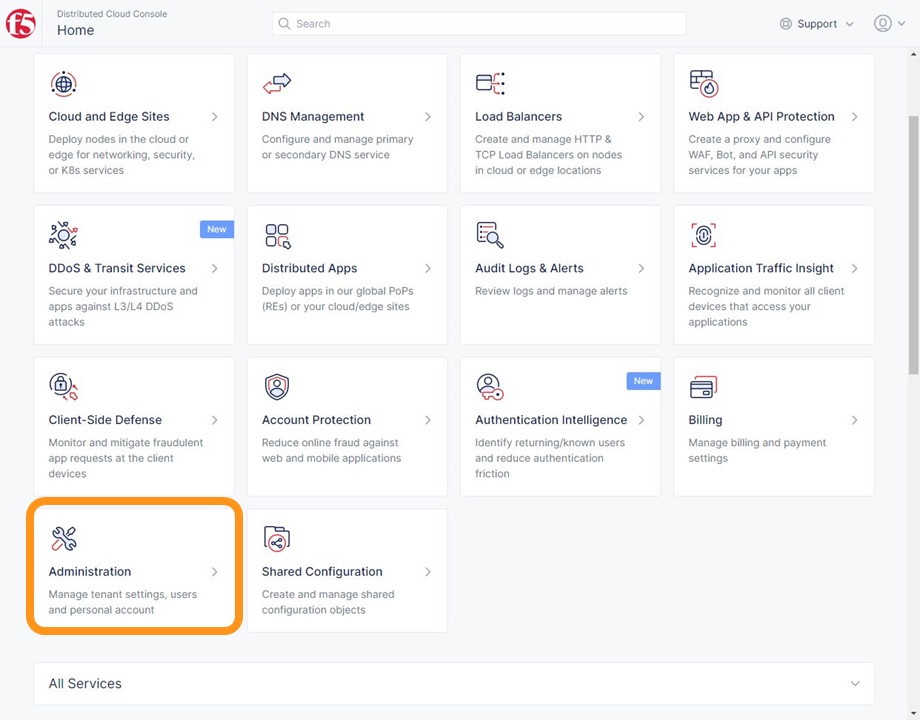
XC のコンソールを開き、 Administration を開きます
Personal Management の Credentials を開き、上部に表示される Create Credentials をクリックします
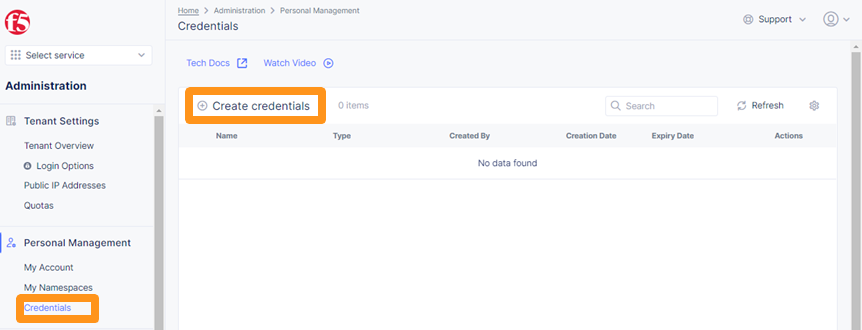
画面左側に表示される項目に各種情報を入力してください。 Credential Type は API Certificate を指定ください。パスワードは、Terraform を利用するホストの環境変数 VES_P12_PASSWORD に指定しますのでメモしてください。
他のパラメータは環境に合わせて自由に指定してください。

入力後、画面最下部の Download をクリックします。ポップアップでファイルのダウンロードを求められますので適当な場所に APIに用いる証明書を保存してください
XC WAAP で Terraform を利用する方法
Terraform ドキュメント
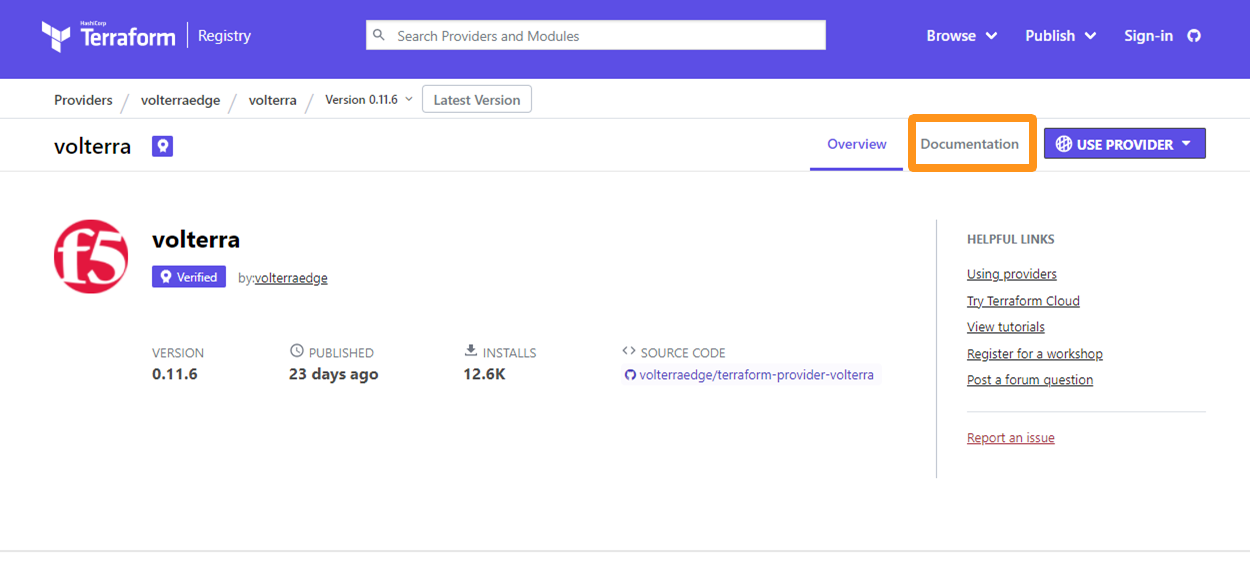
XC WAAP の Terraform は以下ドキュメントで紹介されています
画面右上の Documentation を開いてください
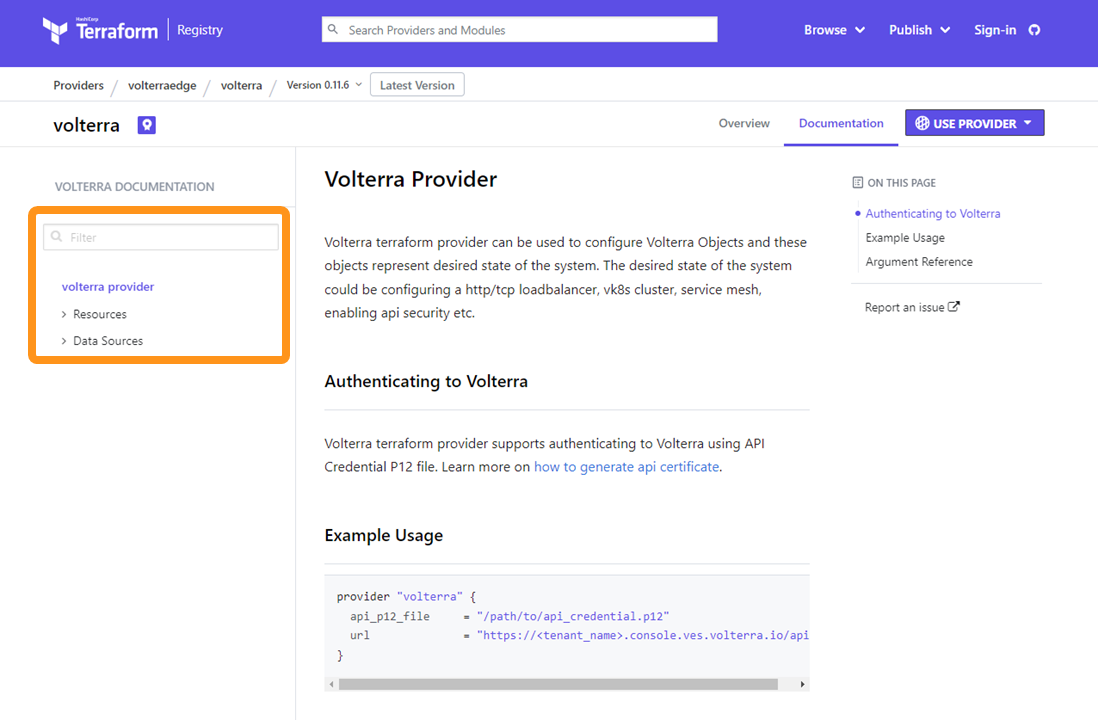
利用の開始は記事中の内容に従って操作してください。 また、画面左側から Provider が提供する各種機能を参照できます
Terraform 証明書の利用
先述の手順で取得した証明書を、Terraformを実行するホストに保存し、Path情報をメモします。
こちらの証明書を利用する際、Terraformは環境変数の VES_P12_PASSWORD の値が、作成した証明書の値と一致する必要があります。実行する環境に合わせて環境変数を設定してください。以下はUbuntuの環境でbashの環境変数として指定する例です
1$ export VES_P12_PASSWORD=**password-string**
F5 XC WAAP Terraform Provider
Provider を利用する際、Terraformで以下ように記述します
1provider "volterra" {
2  api_p12_file     = "/path/to/api_credential.p12"
3  url              = "https://<tenant_name>.console.ves.volterra.io/api"
4}
パラメータとして以下を指定します。
api_p12_file |
- |
APIの認証情報として用いる、P12のファイルのPath情報 |
url |
必須 |
XC の API Endopoint を示すURL。 |
注釈
Free Plan等、個人アカウントでAPIを利用する場合、URLは https://console.ves.volterra.io/api を指定してください。
その他詳細についてはマニュアルの内容を参照してください。
必要なパッケージの確認
XC Terraform の本書作成時点の対応バージョンは以下となります。
Terraform >= 0.13.x
情報は以下を参照してください。 Provider は Terraform 実行時、自動的に取得しますのでこちらのページのBuildは不要です
Terraformのインストール手順は以下を参照してください。
Terraform の動作確認
正しく動作することを確認します。 必要となるファイルを取得してください。
1$ git clone https://github.com/BeF5/f5j-dc-waap-automation
2$ cd f5j-dc-waap-automation/terraform/connection-test
以下、 test.tf の内容を環境に合わせて修正してください。
 1$ vi test.tf
 2
 3terraform {
 4  required_providers {
 5    volterra = {
 6      source  = "volterraedge/volterra"
 7      version = "0.11.6"
 8    }
 9  }
10}
11
12provider "volterra" {
13  api_p12_file = "**/path/to/api_credential.p12-file**"
14  url          = "https://**tenant_name**.console.ves.volterra.io/api"
15}
16
17// example: create healthcheck object
18resource "volterra_healthcheck" "eample-dummy-hc" {
19  name                = "dummy-health-check-t"
20  namespace           = "**your-namespace**"
21  timeout             = 3
22  interval            = 15
23  unhealthy_threshold = 1
24  healthy_threshold   = 3
25  http_health_check {
26    use_origin_server_name = true
27    path                   = "/"
28    use_http2              = false
29  }
30}
terraform init を実行します。初回実行時、6-8行目に示す通り、Providerが取得されます
 1$ terraform init
 2
 3Initializing the backend...
 4
 5Initializing provider plugins...
 6- Finding volterraedge/volterra versions matching "0.11.6"...
 7- Installing volterraedge/volterra v0.11.6...
 8- Installed volterraedge/volterra v0.11.6 (signed by a HashiCorp partner, key ID D9A99FF2F2E29E35)
 9
10Partner and community providers are signed by their developers.
11If you'd like to know more about provider signing, you can read about it here:
12https://www.terraform.io/docs/cli/plugins/signing.html
13
14Terraform has created a lock file .terraform.lock.hcl to record the provider
15selections it made above. Include this file in your version control repository
16so that Terraform can guarantee to make the same selections by default when
17you run "terraform init" in the future.
18
19Terraform has been successfully initialized!
20
21You may now begin working with Terraform. Try running "terraform plan" to see
22any changes that are required for your infrastructure. All Terraform commands
23should now work.
24
25If you ever set or change modules or backend configuration for Terraform,
26rerun this command to reinitialize your working directory. If you forget, other
27commands will detect it and remind you to do so if necessary.
terraform plan を実行します
 1$ terraform plan
 2
 3Terraform used the selected providers to generate the following execution plan. Resource actions are indicated with the following
 4symbols:
 5  + create
 6
 7Terraform will perform the following actions:
 8
 9  # volterra_healthcheck.eample-dummy-hc will be created
10  + resource "volterra_healthcheck" "eample-dummy-hc" {
11      + healthy_threshold   = 3
12      + id                  = (known after apply)
13      + interval            = 15
14      + name                = "dummy-health-check-t"
15      + namespace           = "**your-namespace**"
16      + timeout             = 3
17      + unhealthy_threshold = 1
18
19      + http_health_check {
20          + path                      = "/"
21          + request_headers_to_remove = []
22          + use_http2                 = false
23          + use_origin_server_name    = true
24        }
25    }
26
27Plan: 1 to add, 0 to change, 0 to destroy.
28
29─────────────────────────────────────────────────────────────────────────────────────────────────────────────────────────────────────────
30
31Note: You didn't use the -out option to save this plan, so Terraform can't guarantee to take exactly these actions if you run "terraform
32apply" now.
terraform apply を実行し、設定を反映します。
 1$ terraform apply
 2
 3Terraform used the selected providers to generate the following execution plan. Resource actions are indicated with the following
 4symbols:
 5  + create
 6
 7Terraform will perform the following actions:
 8
 9  # volterra_healthcheck.eample-dummy-hc will be created
10  + resource "volterra_healthcheck" "eample-dummy-hc" {
11      + healthy_threshold   = 3
12      + id                  = (known after apply)
13      + interval            = 15
14      + name                = "dummy-health-check-t"
15      + namespace           = "**your-namespace**"
16      + timeout             = 3
17      + unhealthy_threshold = 1
18
19      + http_health_check {
20          + path                      = "/"
21          + request_headers_to_remove = []
22          + use_http2                 = false
23          + use_origin_server_name    = true
24        }
25    }
26
27Plan: 1 to add, 0 to change, 0 to destroy.
28
29Do you want to perform these actions?
30  Terraform will perform the actions described above.
31  Only 'yes' will be accepted to approve.
32
33  Enter a value: yes   <<< yes と入力する
34
35volterra_healthcheck.eample-dummy-hc: Creating...
36volterra_healthcheck.eample-dummy-hc: Creation complete after 1s [id=******]
37
38Apply complete! Resources: 1 added, 0 changed, 0 destroyed.
Applyが完了しました。コンソールを開き、正しくオブジェクトが作成されたことを確認します

terraform destroy を実行し、設定を削除します
 1$ terraform destroy
 2volterra_healthcheck.eample-dummy-hc: Refreshing state... [id=******]
 3
 4Terraform used the selected providers to generate the following execution plan. Resource actions are indicated with the following
 5symbols:
 6  - destroy
 7
 8Terraform will perform the following actions:
 9
10  # volterra_healthcheck.eample-dummy-hc will be destroyed
11  - resource "volterra_healthcheck" "eample-dummy-hc" {
12      - annotations         = {} -> null
13      - disable             = false -> null
14      - healthy_threshold   = 3 -> null
15      - id                  = "******" -> null
16      - interval            = 15 -> null
17      - labels              = {} -> null
18      - name                = "dummy-health-check-t" -> null
19      - namespace           = "**your-namespace**" -> null
20      - timeout             = 3 -> null
21      - unhealthy_threshold = 1 -> null
22
23      - http_health_check {
24          - headers                   = {} -> null
25          - path                      = "/" -> null
26          - request_headers_to_remove = [] -> null
27          - use_http2                 = false -> null
28          - use_origin_server_name    = true -> null
29        }
30    }
31
32Plan: 0 to add, 0 to change, 1 to destroy.
33
34Do you really want to destroy all resources?
35  Terraform will destroy all your managed infrastructure, as shown above.
36  There is no undo. Only 'yes' will be accepted to confirm.
37
38  Enter a value: yes   <<< yes と入力する
39
40volterra_healthcheck.eample-dummy-hc: Destroying... [id=******]
41volterra_healthcheck.eample-dummy-hc: Destruction complete after 1s
42
43Destroy complete! Resources: 1 destroyed.
44ubuntu@ip-10-0-11-227:~/temp2$ cat test.tf
45terraform {
46  required_providers {
47    volterra = {
48      source  = "volterraedge/volterra"
49      version = "0.11.6"
50    }
51  }
52}
53
54provider "volterra" {
55  api_p12_file = "**/path/to/api_credential.p12-file**"
56  url          = "https://**tenant_name**.console.ves.volterra.io/api"
57}
58
59// example: create healthcheck object
60resource "volterra_healthcheck" "eample-dummy-hc" {
61  name                = "dummy-health-check-t"
62  namespace           = "**your-namespace**"
63  timeout             = 3
64  interval            = 15
65  unhealthy_threshold = 1
66  healthy_threshold   = 3
67  http_health_check {
68    use_origin_server_name = true
69    path                   = "/"
70    use_http2              = false
71  }
72}
削除の結果を確認します。
Terraformを使って正しく、追加、削除が出来ることが確認できました
XC WAAP で API を利用する方法
API ドキュメント
XC WAAP の API は以下ドキュメントで紹介されています
APIのEndpointは以下の内容で指定いただくことが可能です。
**METHOD** https://**tenant_name**.console.ves.volterra.io/api/**service_prefix**/namespaces/**namespace**/
各要素は以下の通りです。
METHOD
実行するHTTP Method。GET / PUT / POST / DELETE 等 用途に合わせて指定する
tenant_name
APIの対象となるTenant名。 Tenant Information のCompany Nameに記載の文字列
service_prefix
/api/config/- 設定オブジェクトに対するCRUD操作・/api/data/- モニタリング等アナリティクス用途・/api/ml/data/- Machine Learningに関する情報取得用途namespace
対象となるネームスペースの名称
注釈
Free Plan等、個人アカウントでAPIを利用する場合、URLは https://console.ves.volterra.io/api/(利用に応じたPATH) を指定してください。
API 証明書の利用
先述の手順で取得した証明書を、APIで参照し利用します。 証明書の利用方法や、オプション、APIクライアントが対応する証明書の形式などは適宜マニュアルを参照してください。
Curlコマンドで実行する場合のサンプルを以下に示します
1$ curl -k https://**tenant_name**.console.ves.volterra.io/api/config/namespaces/**namespace**/http_loadbalancers \
2       --cert **/path/to/api_credential.p12-file**:**password** \
3       --cert-type P12 \
4       -X POST \
5       -d @**OBJECT-CONFIGURATION-JSON**.json
1行目: URLで対象となるテナント、Namespaceを指定しています2行目: 利用するP12ファイルのPATHを指定しています。またコロン(:)に続いて、証明書作成時に指定したパスワードを指定します3行目: 証明書タイプをP12と指定しています4行目: 新規作成のため、POST Methodを指定しています5行目: 対象となるサービスで作成するオブジェクトの設定内容をJSONで送付します
要件に応じてMethodやパラメータを変更することで、設定の追加、変更、削除、ステータスの確認などを行うことが可能です
API の接続確認
Curlコマンドを使った接続確認方法を示します。
System namespace の情報をAPIで取得し、正しく表示されればAPIの接続が正しいことを確認できます
 1$ curl -k https://**tenant_name**.console.ves.volterra.io/api/web/namespaces/system \
 2       --cert **/path/to/api_credential.p12-file**:**password** \
 3       --cert-type P12 \
 4       -X GET
 5
 6{
 7  "object": null,
 8  "create_form": null,
 9  "replace_form": null,
10  "resource_version": "********",
11  "metadata": {
12    "name": "system",
13    "namespace": "",
14    "labels": {
15    },
16    "annotations": {
17    },
18    "description": "",
19    "disable": false
20  },
21  "system_metadata": {
22    "uid": "********",
23    "creation_timestamp": "********",
24    "deletion_timestamp": null,
25    "modification_timestamp": "********",
26    "initializers": null,
27    "finalizers": [
28    ],
29    "tenant": "**your tenant name**",
30    "creator_class": "******",
31    "creator_id": "",
32    "object_index": 0,
33    "owner_view": null
34  },
35  "spec": {
36
37  },
38  "status": [
39  ],
40  "referring_objects": [
41  ]
42}
Tips1. Terraform / API の利用・調査方法について
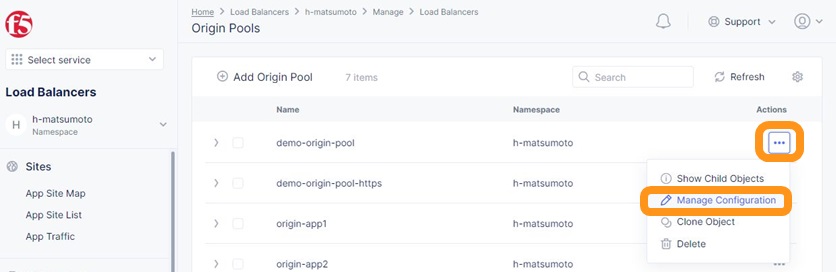
XC は作成済みのオブジェクトがどのような構成情報となるかJSON形式で確認することが可能です。
すでに作成済みのオブジェクトの情報を確認します。対象のオブジェクト一番右側 ‥ から、 Manage Configuration をクリックします
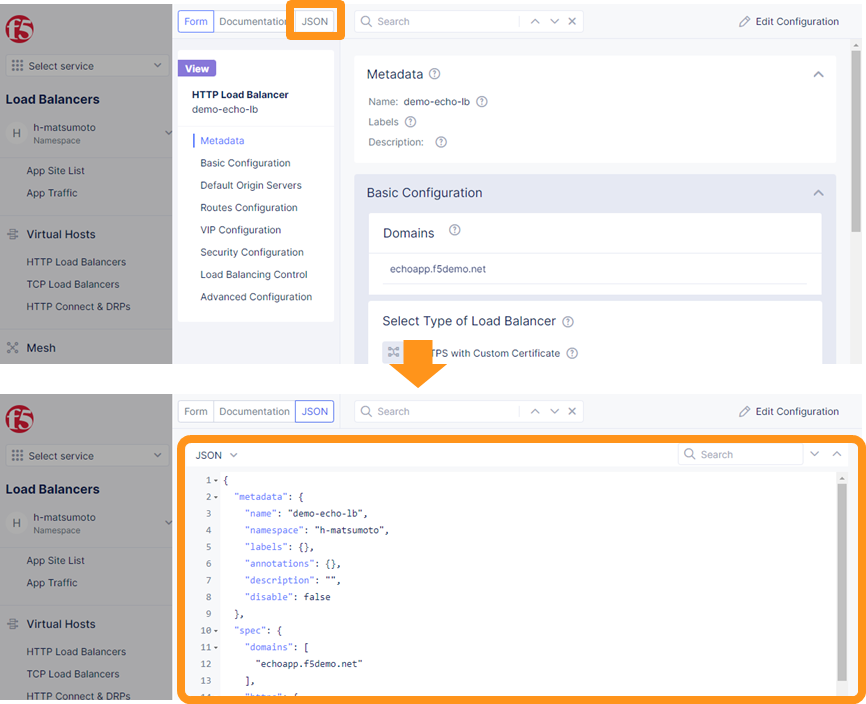
表示された画面上部の JSON をクリックし、設定情報をJSON形式で確認します
Terraform での利用
Terraform Providerはドキュメントに詳細が記載されています。ドキュメントから利用方法を確認します
Terraformで作成されたいオブジェクトをGUIから実際に作成し、作成されたオブジェクトのJSON情報を参考にTerraform Providerの情報を確認すると効率的に調査を進めることが可能です。
また、同等の設定を持つオブジェクトのJSONを保存し、Terraform を通じて作成したObjectのJSONの値と比較することで同等の情報を持つか確認することができます。
API での利用
APIではこちらの画面で取得したJSONをPOSTで送付することで同じオブジェクトを作成することが可能です。
まずはJSONのデータでObjectを作成し、APIの振る舞いを確認し、その後不要な項目の削除やパラメータの確認を進めることができます。